This Sourdough Sandwich Loaf if my absolute favorite recipe! This is a beginner friendly recipe that I still use to this day because it is easy. Most sourdough recipes seem complicated, and I wanted something simple. If it’s complicated, I probably won’t make it. Which is why I am sharing it with you. It’s simple and can be done with a busy lifestyle.
Why Make This Recipe
I started making sourdough about a year ago, 2025. A friend of mine gave me some starter and I’ve been hooked ever since! In the beginning, it was super confusing!! I started by learning how to activate my starter. Then I started testing recipes. My first few recipes fell flat, LITERALLY!! There was no rise to it at all, and the crust was so hard that I couldn’t even chew into it. However, I didn’t give up. I tested until I got something right.
The recipe I am going to share with you is recipe that I used to successfully make my first loaf and over time have tweaked it to perfection. At first, my loaves were molding within a few days. After I tweaked the recipe and tested some storage options, I am now able to store my bread loaves for a couple of weeks.
I’ll be sharing what I did and how you can achieve your first successful sourdough loaf, too.
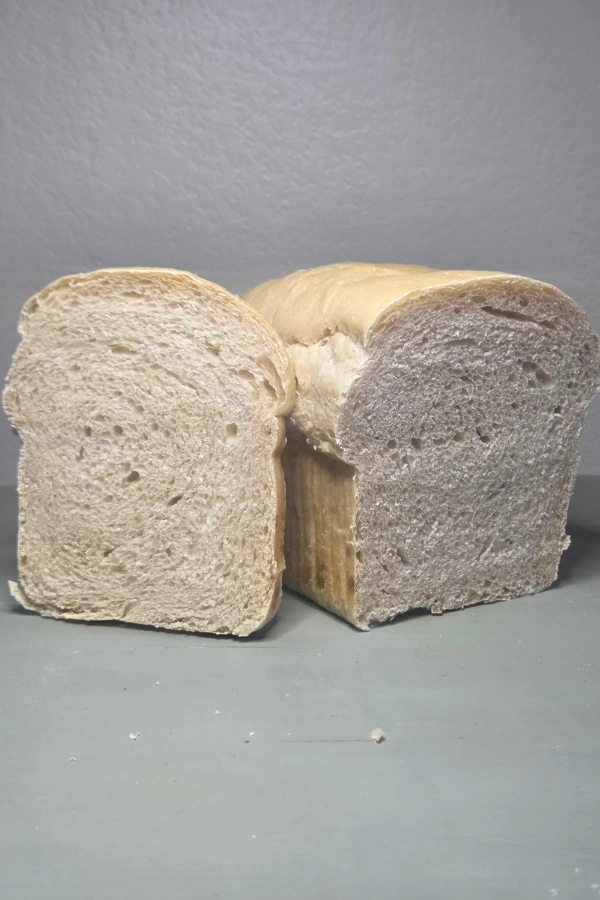
Why Make a Sandwich Loaf
I see so many people making the round sourdough loaves and at first I thought that was the only way you could make them. However, I was wrong! I personally LOVE the sandwich loaf because that’s what I am used to and it seems more functional for me.
The rough loaves seem to get a really hard crust, and I personally like a soft piece of buttered toast. You can make sandwiches, french toast, buttered toast, sloppy joes, and more! I’m not really sure what you could use a round loaf for besides making toast. Just my opinion, of course.
The Recipe
This recipe is as simple as it gets! At least I tried to keep it that way. It can be done in 1 day or you can finish it over the course of 2 days. The honey in this recipe is what helps keep this loaf from molding too quickly. You can use granulated sugar, but it will get moldy within a few of day if left on the counter. Now let’s get to it!
Equipment Needed
- Kitchen Scale measuring Grams
- Medium size bowl
- A cover for bulk rise
- Loaf Pans
Ingredients
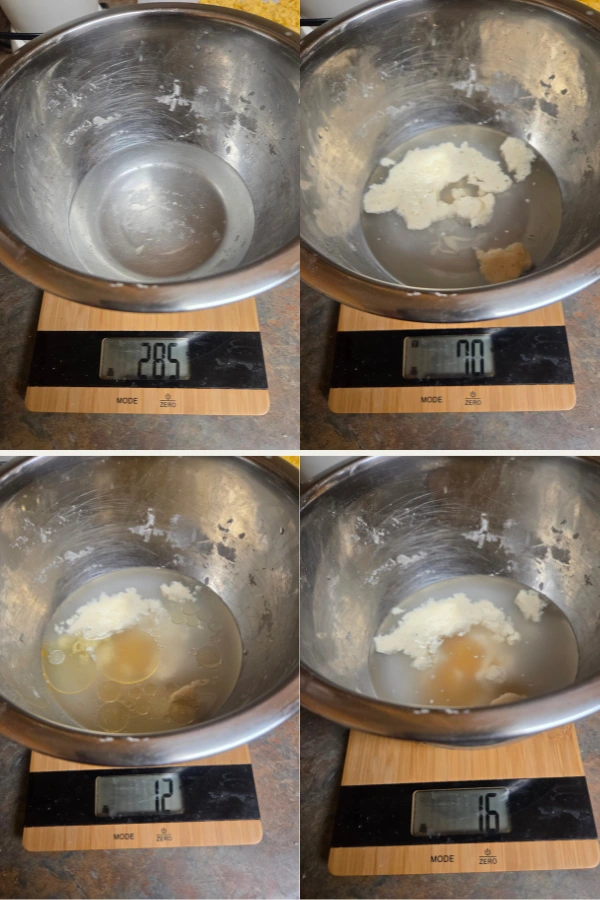
- 285g Water (Room Temp or Lukewarm)
- 70g Active Sourdough Starter
- 12g Cooking Oil (I use Avocado Oil)
- 16g Honey
- 500g Bread Flour
- 13g Salt
Instructions
- You will want to make sure your starter is active before starting this process. I usually start my starter the night before, so it is active and bubbly by morning. I have also started my starter in the morning, then let my dough bulk proof in the fridge overnight then finished baking the next day. How you do it is entirely up to you.
- Once your starter is active, get out your scale and a medium size bowl.
- Make sure your scale is set to grams.
- Place your bowl on the scale and zero it out so your sale reads zero grams.
- Add 285g of water to the bowl.
- Zero out your scale.
- Add 70g of active starter.
- Zero out your scale again.
- Add 12g of cooking oil.
- Zero out your scale again.
- Now add 16g of honey.
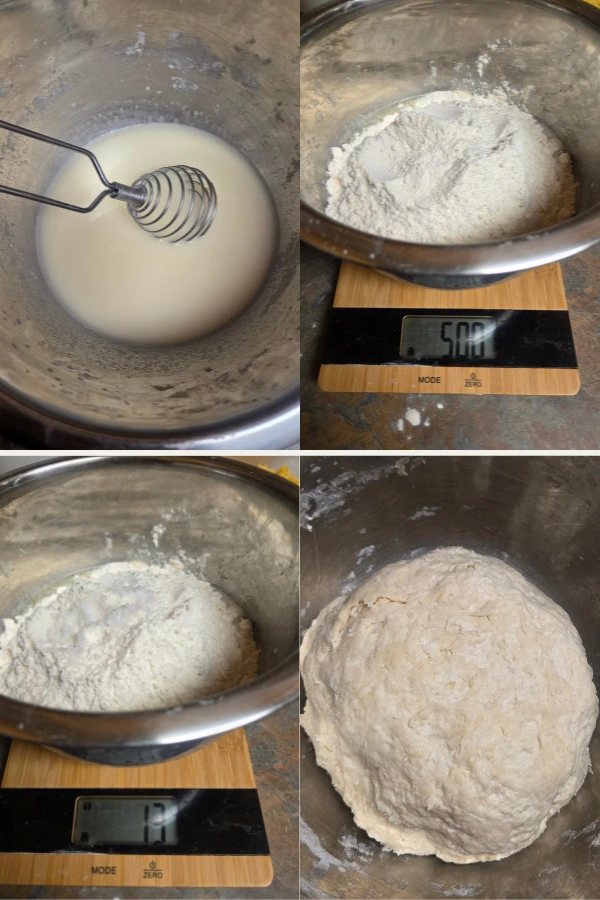
- Whisk it all together until it is fully combined and is a white milky color.
- Zero out your scale again.
- Add 500g bread flour.
- Zero out your scale.
- Add 13g Salt.
- Now give it a good mix until it’s all mixed together and forms a dough.
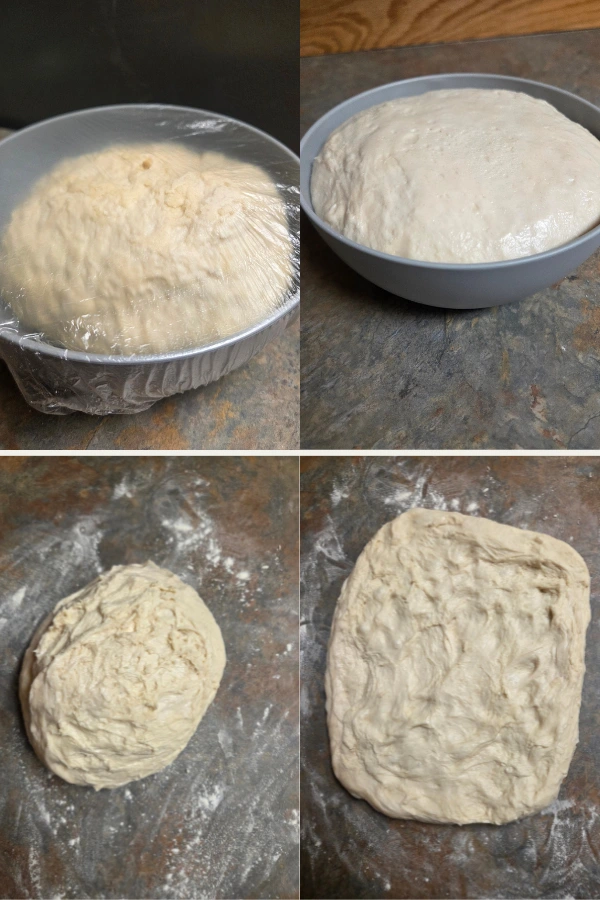
- Move the dough to a small bowl. I use a bowl slightly bigger than my dough so I can see it rise easily.
- Let your dough rest for 15 minutes and then knead the dough for a minute making sure everything is incorporated, then form a ball again.
- Now cover your dough. You can use a towel, plastic wrap, or anything that will keep the air off of it. This is what I like to use –> Bowl Covers.
- Let your dough rise in a warm place until doubled in size. I like to put it in the oven with the light.
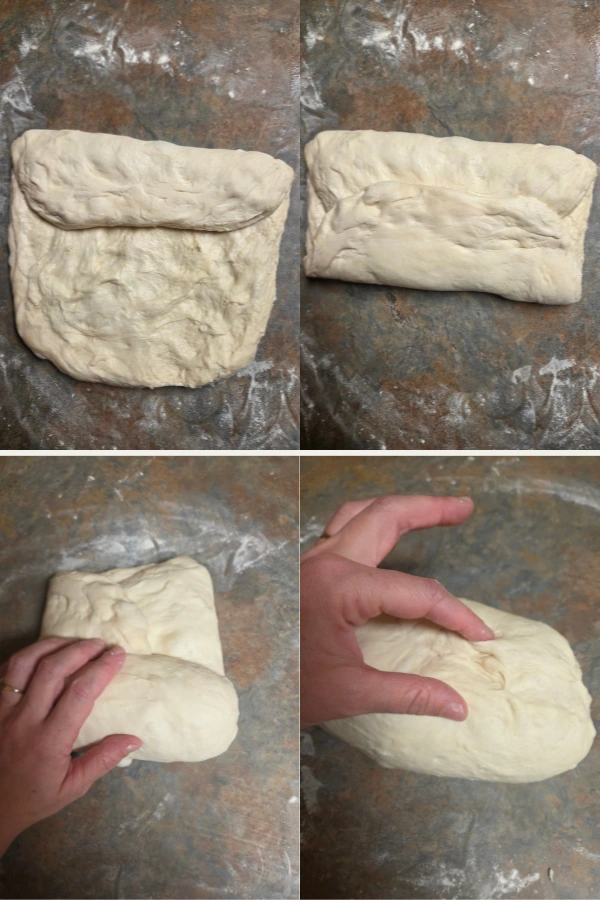
- Once doubled in size, roll it out onto a lightly floured surface.
- Fold 2 side toward the middle to make a hotdog shape. Then roll it long ways to make a loaf shape.
- Flip it over and pinch the edges and seams to seal it and make a solid load shape with no weird flaps or edges.
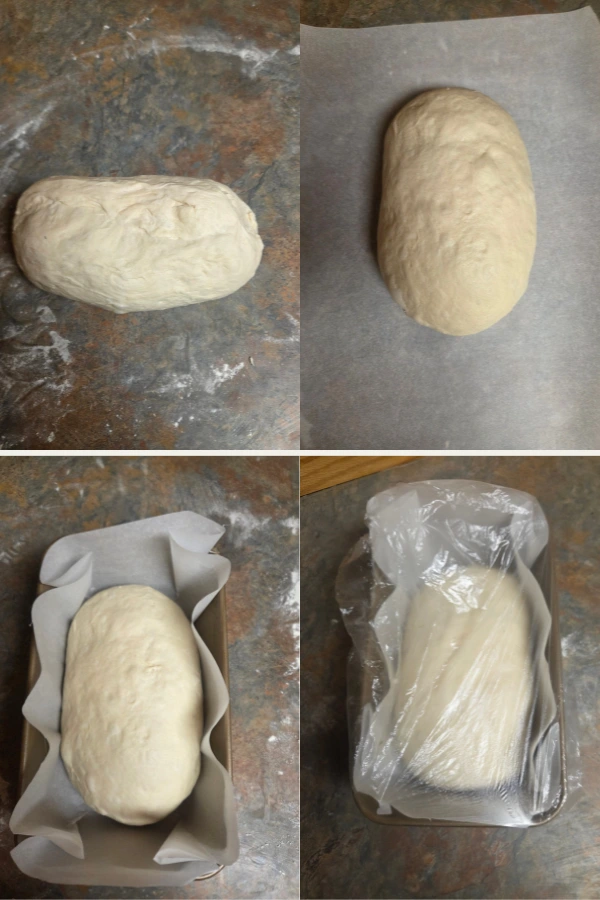
- Place your dough seam side down on a piece of parchment paper and then lower your loaf into the loaf pan. The parchment paper will prevent the loaf from sticking to the loaf pan.
- Cover your loaf pan.
- At this point you can put it in the fridge to bake tomorrow or continue to get ready to bake.
- If you put it in the fridge overnight, take it out of the fridge and move onto the next step.
- You will want to put your cover loaf pan in a warm place to rise again. I like to put it in the oven with the light on.
- Let that rise until to dough is about 1 inch above the edge of your loaf pan.
- If your loaves are in the oven at this point, take them out.
- Now preheat your oven to 375 degrees.
- Once preheated, take the cover off of your loaf pans and bake them for 30 minutes.
- I like to rotate them halfway through to get an even cook.
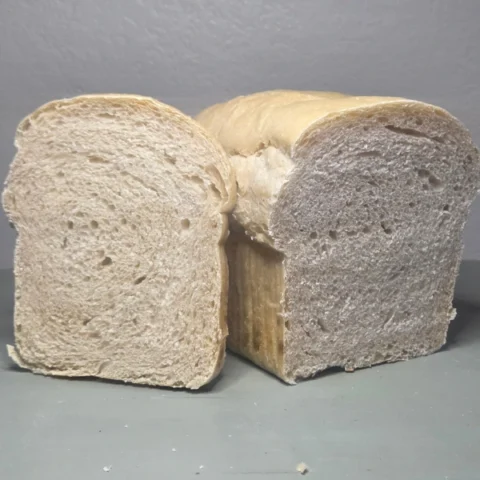
- The tops of your loaf should be a golden-brown color.
- Take them out of the oven, out of the loaf pans and let them cool on a cooling rack. Make sure you cover them with a towel.
- Make sure you let them cool completely before cutting into it.
- Don’t worry if the tops of the bread seem hard, they will soften as it cools if you have them covered with a towel.
- Once they are cooled you can cut into it and use immediately or put in the fridge or freezer for later.
images of Process
Storing tips
If you leave your bread on the counter, it will likely start molding after a week. To make them last a little bit longer, you can store them in the fridge and that usually gives you an extra week before it starts going bad.
You can also store them in the freezer if you want to make them in bulk and then use them throughout the month. You can use freezer bags if you will use them up in a few weeks. If you will be storing them in the freezer long term, you will want to freeze them then vacuum seal the air out of it. By vacuum sealing the bread, you are preventing it from getting freezer burn and lasting longer overall.
Making Smaller Loaves
To make smaller loaves, you can cut the dough in half after you have mixed everything together. By doing this, you will need a smaller loaf pan to cook them in. The result is a mini loaf, perfect for kids or slider sandwiches.
Make sure you keep an eye on it while baking because the cook time may be slightly less than a full loaf. However, the cook time should be fairly close to the normal loaf.
Want Help Building Your Pantry?
When I first got started cooking from scratch, I was so overwhelmed!! If you are too, I am here to help!! I created a FREE Pantry Guide to help you get started without having to figure it all out on your own. I’ve created a simple step by step process that gets you started even when life gets busy.
📌Pin for Later!
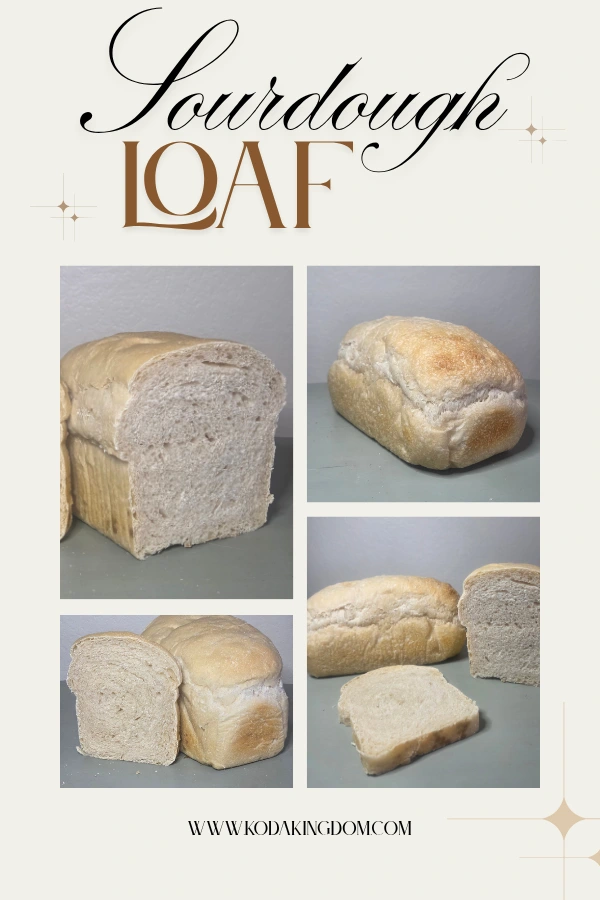
Sourdough Sandwich Loaf
This Sourdough Sandwich Loaf if my absolute favorite recipe! This is a beginner friendly recipe that I still use to this day because it is easy. Most sourdough recipes seem complicated, and I wanted something simple.
Ingredients
Equipment
Ingredients
- 285g Water (Room Temp or Lukewarm)
- 70g Active Sourdough Starter
- 12g Cooking Oil (I use Avocado Oil)
- 16g Honey
- 500g Bread Flour
- 13g Salt
Instructions
- You will want to make sure your starter is active before starting this process. I usually start my starter the night before, so it is active and bubbly by morning. I have also started my starter in the morning, then let my dough bulk proof in the fridge overnight then finished baking the next day. How you do it is entirely up to you.
- Once your starter is active, get out your scale and a medium size bowl.
- Make sure your scale is set to grams.
- Place your bowl on the scale and zero it out so your sale reads zero grams.
- Add 285g of water to the bowl.
- Zero out your scale.
- Add 70g of active starter.
- Zero out your scale again.
- Add 12g of cooking oil.
- Zero out your scale again.
- Now add 16g of honey.
- Whisk it all together until it is fully combined and is a white milky color.
- Zero out your scale again.
- Add 500g bread flour.
- Zero out your scale.
- Add 13g Salt.
- Now give it a good mix until it's all mixed together and forms a dough.
- Move the dough to a small bowl. I use a bowl slightly bigger than my dough so I can see it rise easily.
- Let your dough rest for 15 minutes and then knead the dough for a minute making sure everything is incorporated, then form a ball again.
- Now cover your dough. You can use a towel, plastic wrap, or anything that will keep the air off of it.
- Let your dough rise in a warm place until doubled in size. I like to put it in the oven with the light.
- Once doubled in size, stretch it out onto a lightly floured surface. Pull the sides until you have a square or rectangle.
- Fold 2 side toward the middle to make a hotdog shape. Then roll it long ways to make a loaf shape.
- Flip it over and pinch the edges and seams to seal it and make a solid load shape with no weird flaps or edges.
- Place your dough seam side down on a piece of parchment paper and then lower your loaf into the loaf pan. The parchment paper will prevent the loaf from sticking to the loaf pan.
- Cover your loaf pan.
- At this point you can put it in the fridge to bake tomorrow or continue to Second Rise.
- If you put it in the fridge overnight, take it out of the fridge and move onto the next step.
- You will want to put your cover loaf pan in a warm place to rise again. I like to put it in the oven with the light on.
- Let that rise until to dough is about 1 inch above the edge of your loaf pan.
- If your loaves are in the oven at this point, take them out.
- Now preheat your oven to 375 degrees.
- Once preheated, take the cover off of your loaf pans and bake them for 30 minutes.
- I like to rotate them halfway through to get an even cook.
- The tops of your loaf should be a golden-brown color.
- Take them out of the oven, out of the loaf pans and let them cool on a cooling rack. Make sure you cover them with a towel.
Make the Dough
First Rise
Shaping the Dough
Second Rise
Bake
See Notes: Tops will be hard, cool completely before slicing, storage tips for longer lasting bread and more.
Notes
- You can make mini loaves by cutting the dough in half after you make the dough and before the first rise. However, it will require a smaller loaf pan.
- Make sure you let them cool completely before cutting into it.
- Don't worry if the tops of the bread seem hard, they will soften as it cools if you have them covered with a towel.
- Once they are cooled you can cut into it and use immediately or put in the fridge or freezer for later.
- If you leave it on the counter, it will last 1 week before going bad.
- If you put it in the fridge, it will last 2 weeks before going bad.
- If you put it in the freezer is a freezer bag, will last a month.
- If you freeze it and then vacuum seal it, it will last multiple months.
- If it over proofs and falls flat, you can still bake it, but it will be much denser.
- Need Pictures? They are posted in the main blog post.
- The tools I recommend are linked in the equipment section or here is all of them --> Recommended Tools.
- Other recipes you might like: Sourdough Tortillas. Sourdough Dinner Rolls.
- Want help building your pantry? I made you a FREE Pantry Guide.