Vanilla was just the beginning.
After Curtis declared my homemade vanilla ice cream better than anything from the store, I knew I wasn’t stopping there. Strawberry has always been our favorite. Not the neon pink kind with “natural flavors” doing all the work. Real strawberry flavor that tastes like actual fruit.
I played around with it for a while before I got it right. Too much vanilla extract and it fights the strawberry. Too much water from the fruit and you get ice crystals instead of that creamy, smooth texture that makes homemade ice cream worth making in the first place.
Curtis was my taste tester through every round. He is an honest man. When I overloaded the vanilla on one batch he looked at me and said “it’s good but the vanilla is overpowering the strawberry” He was right. I dropped it to one teaspoon and the strawberry came forward the way it was supposed to.
This is that recipe.
Homemade strawberry ice cream in a nutshell: The base is the same six-ingredient recipe as my vanilla: sugar, flour, milk, egg, heavy cream, and just a teaspoon of vanilla extract. What makes it strawberry is the fruit you fold into the base. I use freeze dried strawberries because they give you the most concentrated strawberry flavor without adding water that causes ice crystals. I’ll walk you through all your fruit options below so you can use what you have.
Why I Use Freeze Dried Strawberries (And What to Use If You Don’t Have Them)
This is the most important part of getting the flavor and texture right, so I want to walk through your options honestly.
Freeze Dried Strawberries
This is what I use and what I recommend if you have access to them. Freeze drying removes almost all the moisture from the fruit while keeping the flavor completely intact. You get pure, concentrated strawberry flavor without adding any water to your ice cream base. And water is the enemy of creamy texture. It’s what causes ice crystals.
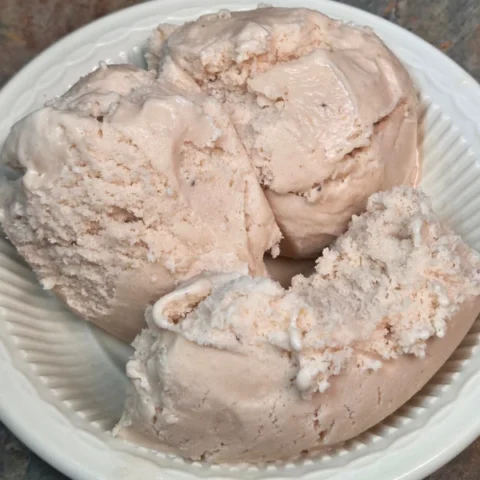
I grind the freeze dried strawberries into a fine powder and whisk them right into the milk mixture. They dissolve completely and color the whole base that beautiful pink. That’s the look you’re seeing in every one of these photos.
If you have a Harvest Right freeze dryer, you can freeze dry your own strawberries at home and have them ready to go year round. If you don’t have a freeze dryer yet, these freeze dried strawberries on Amazon are a great option and what I’d reach for.
Dehydrated Strawberries
Dehydrated strawberries work really well too. The difference from freeze dried is that dehydrating removes moisture through heat, so the fruit shrinks down and gets leathery rather than light and crisp. The flavor is still great. The key is to blend the dehydrated strawberries into a very fine powder before adding them to your milk mixture. If you add them with any chunks still present, you’ll end up with bits of fruit in the base that don’t fully incorporate. A quick run through a blender or food processor gets them where they need to be.
Fresh Strawberries
I haven’t personally made this with fresh strawberries but it absolutely can be done. Hull and slice fresh strawberries, then cook them down in a small saucepan with a tablespoon or two of sugar until they reduce significantly and most of the water has cooked off. You want a thick, jammy strawberry reduction. Not watery fruit. Let that cool completely before adding it to your base. The reason you want to cook it down is the same reason I choose freeze dried: water creates ice crystals and takes away from that creamy texture. If you cook the water out, you protect the texture.
What About Frozen Strawberries
I would skip them unless you reduce them down first. Frozen strawberries hold a lot of water and if you add them straight to your base, or even thaw and mash them without reducing, that water goes directly into your ice cream and you will end up with a grainy, icy texture. If frozen is all you have, cook them down the same way you’d treat fresh. Reduce them until they’re thick and the excess liquid has evaporated. Then let them cool fully before adding.
The throughline is always the same: less water in the fruit means creamier ice cream.
What You Need to Make This
Equipment
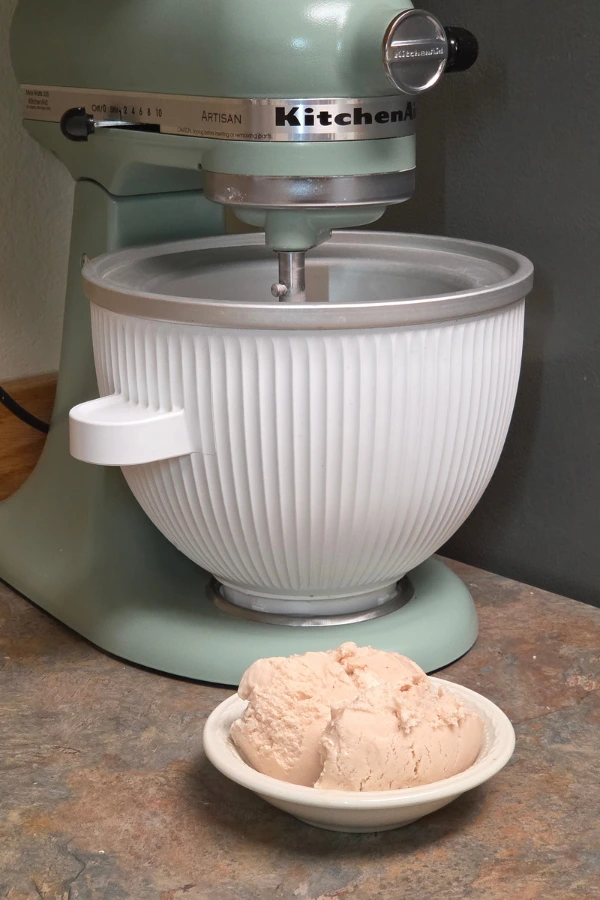
This recipe requires a KitchenAid stand mixer with the ice cream bowl attachment. I’ve been over this in my vanilla post and I’ll say it again here: I tried every other method before landing on this one and nothing comes close. The bowl stores in the freezer, it’s compact, and the texture it produces is genuinely creamy in a way that other methods just don’t achieve.
If you already have the KitchenAid, the ice cream attachment is all you need. If you’re still on the fence about getting one, I’ll tell you the same thing I always tell people: I use mine for ice cream, bread, pasta, and about a hundred other things. It earns its space.
The One Prep Step That Matters
Your ice cream bowl needs 26 hours in the freezer before you start. Not overnight. Not 12 hours. Twenty-six hours minimum, completely frozen solid all the way through. If it isn’t, your base will just spin in the bowl and never churn into ice cream.
I keep mine in the freezer permanently. It takes up the space of a large mixing bowl and I’m always ready to go.
Ingredients
- 1/2 cup sugar
- 1 1/2 tbsp flour
- 1 1/4 cup milk
- 1 egg
- 1 tsp vanilla extract (note: this is less than the vanilla recipe. The strawberry needs room to come forward)
- 1 cup heavy cream
- 1/2 cup freeze dried strawberries, ground to powder (or your chosen fruit option. See notes)
How to Make It
Step 1: Prepare your strawberries If using freeze dried or dehydrated strawberries, blend them into a fine powder. Set aside. If using fresh or frozen, cook them down into a thick reduction and let cool completely before proceeding.
Step 2: Make the base In a medium saucepan, combine the sugar, flour, and milk. Whisk over medium heat until the sugar is fully dissolved and the mixture is smooth. Bring it to a soft boil, whisking the whole time so nothing sticks.
Step 3: Add the strawberries While the base is still hot, whisk in your strawberry powder. It will dissolve right in and turn the base a beautiful soft pink. If you’re using a cooked strawberry reduction, add it at this stage too.
Step 4: Add the egg In a small separate bowl, whisk your egg until smooth. Slowly pour it into the hot milk mixture while whisking constantly. You’re tempering the egg in, not scrambling it. Keep whisking until fully combined. Pull it off the heat.
Step 5: Cool completely Pour the base into a shallow, wide container. More surface area means faster cooling. Let it come to room temperature on the counter, then move it to the back of the refrigerator for at least two hours. Overnight is even better. The base needs to be completely cold before it goes into the bowl.
Step 6: Add the cream and vanilla Once the base is fully cold, whisk in the heavy cream and one teaspoon of vanilla extract.
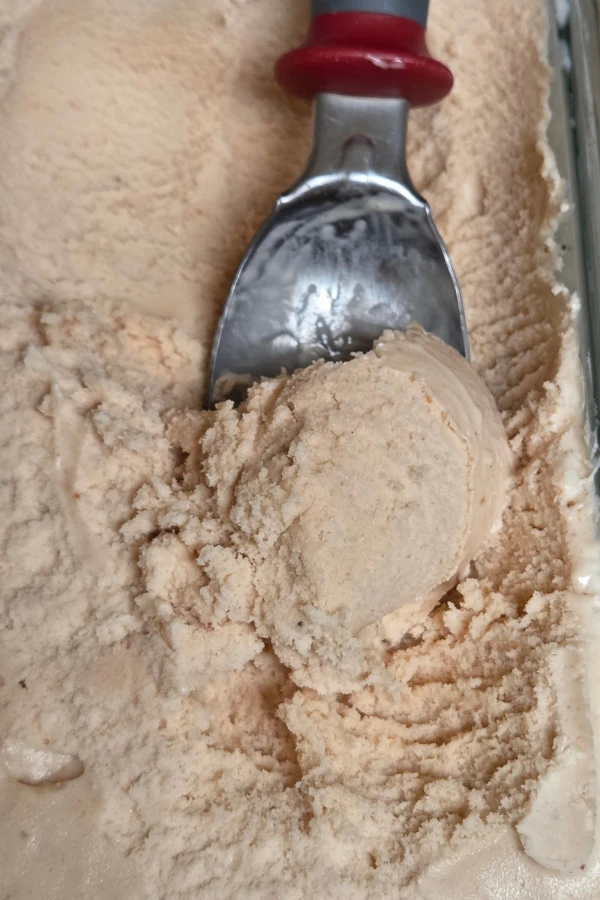
Step 7: Churn Attach your frozen bowl to the stand mixer, pour in the ice cream mixture, lock on the ice cream paddle, and set it to the stir setting. Let it run for about 30 minutes. You’re looking for a soft serve consistency. Thick, holds its shape when scooped, but still soft.
Step 8: Freeze Transfer to an airtight, freezer-safe container and freeze for at least 2 hours before serving. This takes it from soft serve to fully scoopable ice cream.
The Texture Secret (Same Rule, Different Flavor)
Everything I wrote about getting the texture right on the vanilla recipe applies here just as much. The base temperature matters. The bowl temperature matters. And with a fruit flavor, the moisture content of your fruit matters just as much as both of those.
The photos in this post are what you’re going for. That pale, creamy pink color with no visible ice crystals, scooping clean and smooth. That happens when your base was fully cold before churning, your bowl was frozen all the way through, and your strawberries brought flavor without extra water.
If yours comes out icier than you wanted, that’s almost always a moisture issue in the fruit. Go drier next time.
If you are the kind of woman who reads an ingredient label and puts it back on the shelf, you are exactly who I write for.
I put together a free guide called The From-Scratch Pantry System that walks you through how to stock your kitchen so cooking from scratch actually feels easy. No overwhelming overhaul. Just a simple system built around what you actually cook. Grab it below.
Storing Your Strawberry Ice Cream
In the freezer in an airtight container, this ice cream keeps for about two weeks before you start noticing any change in texture. After two weeks it can get a little icier. Not ruined, just different.
For best results, press a piece of parchment paper directly against the surface of the ice cream before putting the lid on. This keeps ice crystals from forming on top.
I haven’t tried freeze drying it yet, but I really want to. If you have a Harvest Right and you’ve made freeze dried ice cream, drop a comment below and tell me how it turned out.
Make It Your Own
The same base recipe that works for vanilla and strawberry works for any fruit flavor you want. A few variations worth trying:
- Peach — reduce fresh peaches the same way you’d treat fresh strawberries, or use freeze dried peach powder
- Raspberry — freeze dried raspberries blend into powder beautifully and give you a deeper, more tart flavor
- Blueberry — same process, just know the color will be more muted than you expect
- Mixed berry — combine whatever freeze dried fruit you have on hand
The rules stay the same for all of them: keep the moisture low, cool the base completely, and give the bowl its full 26 hours.
Homemade Strawberry Ice Cream From Scratch (Stand Mixer Method)
Creamy, real-strawberry ice cream made with six simple ingredients and no preservatives. Uses the KitchenAid ice cream bowl attachment and freeze dried strawberries for the most concentrated flavor without the ice crystals. The same base as my vanilla recipe with one small but important change. One teaspoon of vanilla, not one tablespoon, so the strawberry actually comes through.
Ingredients
- 1/2 cup sugar
- 1 1/2 tbsp flour
- 1 1/4 cup milk
- 1 egg
- 1 tsp vanilla extract
- 1 cup heavy cream
- 1/2 cup freeze dried strawberries, blended to fine powder
Instructions
- Blend freeze dried strawberries into a fine powder and set aside.
- In a medium saucepan, whisk together sugar, flour, and milk over medium heat until smooth and gently boiling.
- Whisk strawberry powder directly into the hot milk mixture until fully dissolved.
- In a small bowl, whisk egg smooth. Slowly pour egg into the hot mixture while whisking constantly to temper it in. Remove from heat.
- Pour base into a shallow container and cool to room temperature, then refrigerate until completely cold (minimum 2 hours, overnight preferred).
- Whisk heavy cream and vanilla into the cold base until combined.
- Attach the frozen ice cream bowl to stand mixer. Pour in base, attach the ice cream paddle, and churn on the stir setting for approximately 30 minutes until soft serve consistency.
- Transfer to airtight freezer container. Freeze 2 hours before serving.
Notes
Storage:
Store covered in the freezer up to 2 weeks. Press parchment paper against the surface before sealing to prevent ice crystals on top.
- Using fresh strawberries? Cook them down with 1-2 tbsp sugar until reduced and jammy. Cool completely before adding to base.
- Using dehydrated strawberries? Blend into a very fine powder before adding. Any chunks will not incorporate properly.
- Avoid adding frozen strawberries directly. The excess water will cause ice crystals. Reduce them first.
- The vanilla is intentionally just 1 tsp here, not 1 tbsp. The strawberry flavor needs space.
- Don't have a freeze dryer? These freeze dried strawberries on Amazon work great.
- See the full Homemade Vanilla Ice Cream post for the base recipe and equipment guide.
Strawberry ice cream in the summer, made from scratch, with nothing in it that you can’t pronounce. That’s the version of summer I’m after.
I hope this batch comes out exactly the way you’re picturing it. And if you try a different fruit variation using this base, I really want to know how it turned out. Drop a comment below and tell me what you made.
With love and adventure,